Last Updated: October 23, 2026
Quick Summary
Good splashback tiling comes down to preparation and layout, not speed. Check the wall for level and soundness, measure the area and add a waste allowance, then set out your starting lines before spreading any adhesive. Work in small sections and check level as you go.
- Wash the wall to strip grease and dust before tiling, as adhesive won’t bond to cooking residue.
- Measure each wall section in square metres, add a waste allowance, then round up when buying tiles.
- Centre the layout on the most visible wall section and avoid tiny slivers at corners.
- Spread adhesive in small sections so it doesn’t skin over before you reach it.
- Always isolate the power before working near power points, and use a licensed electrician if unsure.
Before You Start: What DIY Splashback Tiling Really Involves
Kitchen splashback tiling is the job of fixing a wipe-clean tiled surface to the wall behind your bench, and it rewards patience far more than speed. This guide from Bargain Factory Tile Outlet covers the practical steps that separate a clean finish from a wobbly one.
The honest version: most of the work happens before a single tile goes up. Setting out, checking the wall and planning your layout decide the result. The tiling itself is the easy part.
The biggest mistake is buying tiles before you’ve measured the wall and checked it for level. A bowed or uneven wall changes your adhesive choice and your layout, and it can add hours to the job.
Kitchen Splashback Tiling Tools and Materials to Gather First
Gather your splashback tiling tools and materials before you start, so you’re not hunting for a notched trowel mid-wall. A basic kit covers most domestic jobs.
Tools:
- Notched trowel (check the adhesive bag for the right notch size)
- Spirit level, 600 mm or longer
- Tape measure, pencil and a chalk line
- Tile cutter or wet saw for porcelain
- Tile spacers and wedges
- Rubber grout float and finishing sponge
- Bucket, mixing paddle and drill
- Safety glasses and knee pads
Materials:
- Tiles, plus a small waste allowance
- Tile adhesive suited to your tile type and wall
- Grout and matching silicone for edges
- Primer if the wall or adhesive maker requires it
Check the manufacturer’s installation guidance for your specific adhesive and tile. Product data sheets tell you the correct trowel notch and whether priming is needed.
How to Prepare a Wall for Tiling
Preparing a wall for tiling means getting a clean, sound, flat surface that adhesive can grip. Skip this and even perfect tiles will look uneven.
Start by removing the old splashback, then wash the wall to strip grease and dust. Kitchen walls collect cooking residue, and adhesive won’t bond to it.
Checking the Surface and Fixing Problem Areas
Run a straight edge or level across the wall in several directions. Small hollows can be filled with patching compound. Loose plaster, crumbling render or flaky paint needs to come off first.
- Grease and dust: wash and let dry fully
- Loose or flaky surface: scrape back and patch
- Large dips or bows: build up with patching compound, or get advice
- Glossy painted walls: often need sanding or a primer
If the wall is badly out of true, or you’re tiling near a wet area, ask a qualified tradesperson. Waterproofing and substrate suitability depend on the product, the location and the applicable requirements, so confirm the details for your situation rather than assuming. Proper preparation of the underlying surface remains the most effective method for avoiding wall damage during the removal of old tiles or the installation of new ones.
How Many Tiles Do I Need for a Splashback?
To work out how many tiles you need for a splashback, measure the tiled area in square metres, then add a waste allowance for cuts and breakages. There’s no universal percentage: it depends on your layout and how many cuts you’ll make.
Measure the length and height of each wall section you’re tiling. Multiply length by height for each, then add them together. That’s your area in square metres.
A Worked Example With Assumptions
Here’s a clearly hypothetical example. Say your splashback runs 3.0 m along the bench and is 0.6 m high.
- Area = 3.0 m × 0.6 m = 1.8 m²
- Add a waste allowance, say 10% for a simple layout with few cuts: 1.8 × 1.10 = 1.98 m²
- Round up and buy 2 m² of tiles
A busier layout with lots of cuts around power points and corners may need a larger allowance. Check current product pages for tile sizes and coverage.
Buy all your tiles in one order from the same batch where possible. Tiles from different batches can vary slightly in shade, and matching later is harder than buying enough up front.
Planning Your Kitchen Splashback Tile Layout
A good kitchen splashback tile layout starts with where the eye lands: the bench line and the centre of the wall. Plan this before you fix anything.
Decide on your pattern first. Stacked, herringbone, subway offset and mosaic sheets all behave differently around corners and power points. Subway and mosaic styles are popular for splashbacks because they handle cuts well.
- Centre the layout on the most visible wall section
- Avoid tiny slivers at corners or edges
- Line up grout joints with the bench and any window edges
- Dry-lay a row to check how cuts fall
Mark your starting lines on the wall with a level and pencil. Getting this right now saves rework later.
Setting Out, Adhesive and Cutting Around Power Points
Setting out means fixing your level guide lines, then spreading adhesive and pressing tiles into place. Work in small sections so the adhesive doesn’t skin over before you reach it.
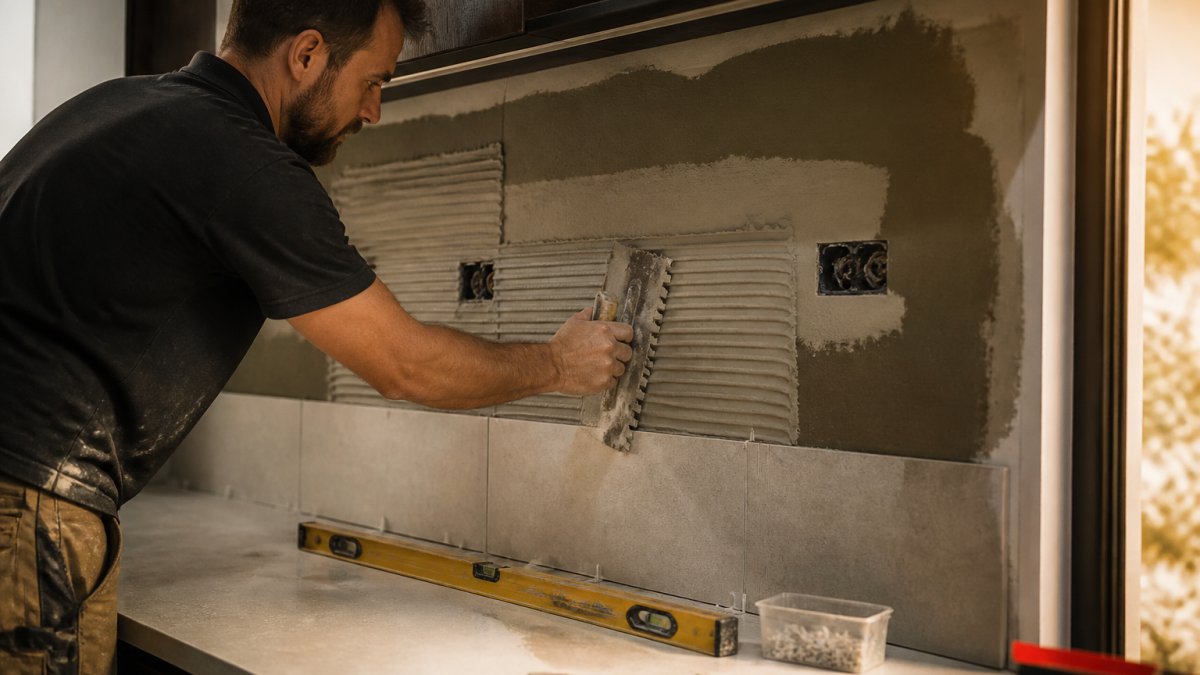
Spread adhesive with the notched trowel at a consistent angle, then press each tile firmly and twist slightly to bed it. Use spacers to keep joints even. Check level as you go.
Power points need care. Always isolate the power first and follow the rules for working near electrical fittings. Cut tiles to fit around the plate, and keep cuts neat and covered by the faceplate where possible. If you’re unsure about electrical work, get a licensed electrician involved.
Common Mistakes to Avoid Before You Grout
Before you grout, check your work against the mistakes that ruin splashbacks most often.
- Spreading too much adhesive: it skins over and tiles won’t bond
- Skipping the level check: small errors compound across a wall
- Grouting too early: follow the adhesive maker’s cure time
- Using the wrong grout or silicone: match them to the tile and location
- Forgetting edge sealing: silicone at the bench and edges keeps water out
Let the adhesive cure fully before grouting. Then grout, sponge clean, and finish edges with silicone. Check the Standards Australia guidance on tiling and your product data sheets for cure times and suitability.
The clean finish you’re chasing comes from preparation and layout, not speed. Measure twice, set out once, and check level at every stage.
Conclusion
A tidy splashback comes down to a sound wall, a planned layout and patient setting out. Get those right and the tiling itself is straightforward.
If you’re choosing tiles or adhesives, our team at Bargain Factory Tile Outlet can help you match products to your wall and layout. Browse the range online or visit our Campbelltown showroom for tile-selection advice.
Frequently Asked Questions
Can a beginner tile a kitchen splashback?
A small, flat splashback is one of the more manageable tiling jobs for a confident beginner, because the area is limited and mostly above bench height. The work still depends on good wall preparation, accurate measurements and careful cutting around power points. Practice on a board first, use the right kitchen splashback tiling tools, and check your adhesive and grout instructions before starting. If the wall is uneven, damaged or you are unsure about waterproofing requirements near wet areas, speak to a qualified tiler.
How do I prepare a wall before tiling a splashback?
Remove old splashback material, clean off grease and dust, and check the surface is sound, dry and flat. Fill cracks and hollow patches with a suitable filler or render, then sand back. Porous or high-suction surfaces may need a primer recommended by the adhesive manufacturer. Knowing how to prepare a wall for tiling properly matters more than the tile choice in many cases, because adhesive bonds to the substrate, not to paint or loose plaster. Let any repairs cure fully before tiling.
How many tiles do I need for a splashback?
Measure the length and height of the splashback in metres, multiply to get the area, then divide by the area of one tile. Add a waste allowance for cuts, breakages and future repairs; the right percentage depends on your layout and how many cuts are needed. For example, a 3 m by 0.6 m splashback is 1.8 m², and you would order above that to cover offcuts. Keep a few spare tiles stored safely.
How long should tile adhesive dry before grouting?
Follow the adhesive manufacturer’s instructions, because drying times vary with the product, tile size, substrate and room conditions. As a general guide, most adhesives need at least 24 hours before grouting, and some need longer in cool or humid conditions. Do not grout while the adhesive is still soft, and do not walk away assuming a fixed time applies to every product. Check the bag or technical data sheet, and if in doubt, wait longer.
Ready to start your splashback? Browse our wall and mosaic tile ranges online, or get directions to our Campbelltown showroom for help choosing the right tiles and accessories for your project.