Last Updated: October 16, 2026
Why Tile Renovation Costs Blow Out (And How to Prevent It)
Most tile projects don’t blow the budget on the tiles themselves. They blow it on the things nobody measured twice.
Calculating total tile renovation costs accurately comes down to five moving parts: tiles, adhesive and grout, prep work, labour, and wastage. Miss any one of them and the final invoice will surprise you. This guide from Bargain Factory Tile Outlet walks through each part, in order, with a worked example you can copy for your own project. Accounting for these variables ensures your budget remains realistic, especially when contextualised against the broader renovation cost guide.
The biggest trap is treating the tile price as the project price. It never is.
- Tiles are usually the largest single material cost, but not the whole cost
- Adhesive, grout, trims and spacers add up fast
- Prep work (screeding, waterproofing membranes) is where budgets quietly die
- Labour is often the biggest line item of all
Get the order right and the maths becomes simple. Get it wrong and you’ll be back at the shop mid-project, which is the most expensive trip of all.
How to Work Out How Many Tiles You Need
To work out how many tiles you need, measure the area in square metres, then divide by the coverage of one tile, then add a wastage allowance.
That’s the whole formula. Everything else is detail.
Square metres = length × width
For a 3 m × 2 m bathroom floor, that’s 6 m². If your tile covers 0.09 m² each, you need about 67 tiles before wastage.
Wastage isn’t a fixed number. It depends on your layout, the number of cuts, and how complex the room shape is.
Ordering exactly the measured quantity is a common mistake. One broken tile or one bad cut and you’re short, and a second order may come from a different batch with a slightly different shade.
Measuring Your Space and Accounting for Wastage
Measure each surface separately, then add them together. Don’t measure the room once and multiply.
- Floors: length × width for each room or area
- Walls: height × width, minus doors and windows
- Splashbacks: measure the actual tiled area, not the whole wall
For wastage, a straight-lay room with few cuts needs less than a diagonal layout with many cuts. Skirting, niches and herringbone patterns all increase waste. A tiler will often allow more than a DIY installer, because they know how cuts actually fall.
Always check the tile’s stated coverage on the product page, since tile sizes vary and nominal sizes aren’t always the true size.
Understanding Tile Cost Per Square Metre
Tile cost per square metre is the price of the tile divided by its coverage area, and it’s the only fair way to compare tiles of different sizes.
A large-format tile and a small mosaic can look similar in price per tile while being wildly different per square metre. Always compare on the same unit.
- Larger tiles usually cover more area per piece, so fewer are needed
- Smaller tiles and mosaics need more pieces and more adhesive
- Natural stone and porcelain look-alikes are priced differently, so compare like for like
- Trims, spacers and levelling clips are separate costs, not part of the tile price
We don’t publish prices here because they change with range, size and availability. Check the current product pages for live pricing, or ask in the showroom and we’ll work through the options with you.
Using a Tile Adhesive and Grout Calculator
A tile adhesive and grout calculator estimates how much adhesive and grout you need based on tile size, trowel notch and joint width.
You can do the same maths by hand. Adhesive coverage depends on the trowel you use and the tile’s back profile.
- Larger tiles and uneven backs need more adhesive
- Wider joints use more grout
- Mosaics use far more grout per square metre than large-format tiles
- Always round up, never down
Manufacturers print coverage figures on the bag, and those figures assume a flat substrate and correct trowel. On an uneven floor, expect to use more.
Buy adhesive and grout from the same range as your tiles where possible. It takes one variable out of the equation if something goes wrong, and it can make matching easier.
If your substrate isn’t flat, fix that before you calculate anything. Adhesive is not a levelling compound, and using it as one gets expensive quickly.
Getting a Realistic Tile Installation Cost Estimate
A realistic tile installation cost estimate separates materials from labour, then adds prep and finishing as their own lines.
Most blowouts come from lumping everything into one number and hoping.
- Materials: tiles, adhesive, grout, trims, spacers, waterproofing
- Prep: removing old coverings, screeding, patching, priming
- Labour: tiling, cutting, grouting, silicone
- Finishing: sealing natural stone, cleaning, waste removal
Labour rates vary by tiler, location and job complexity, so get at least two quotes and ask what’s excluded. Waterproofing in wet areas is a common exclusion, and it matters. Suitability of any tile, adhesive or membrane depends on the product, the location and the applicable requirements for your project, so confirm the details with a qualified professional before work starts.
For guidance on Australian building requirements, see the National Construction Code and Standards Australia.
A Worked Example: Calculating Total Tile Renovation Costs
Here’s a hypothetical example to show how the lines add up. It uses round numbers for clarity, not real pricing.
The project: a 6 m² bathroom floor, straight lay, simple rectangular room.
- Measure the area: 3 m × 2 m = 6 m²
- Add wastage: 10% for a simple layout = 6.6 m² of tiles to order
- Count tiles: 6.6 m² ÷ 0.09 m² per tile ≈ 74 tiles
- Adhesive: based on the bag’s stated coverage for your trowel, rounded up
- Grout: based on joint width and tile size, rounded up
- Prep: allowance for screeding and waterproofing the wet area
- Labour: quoted per square metre by your tiler
- Finishing: silicone, cleaning, waste removal
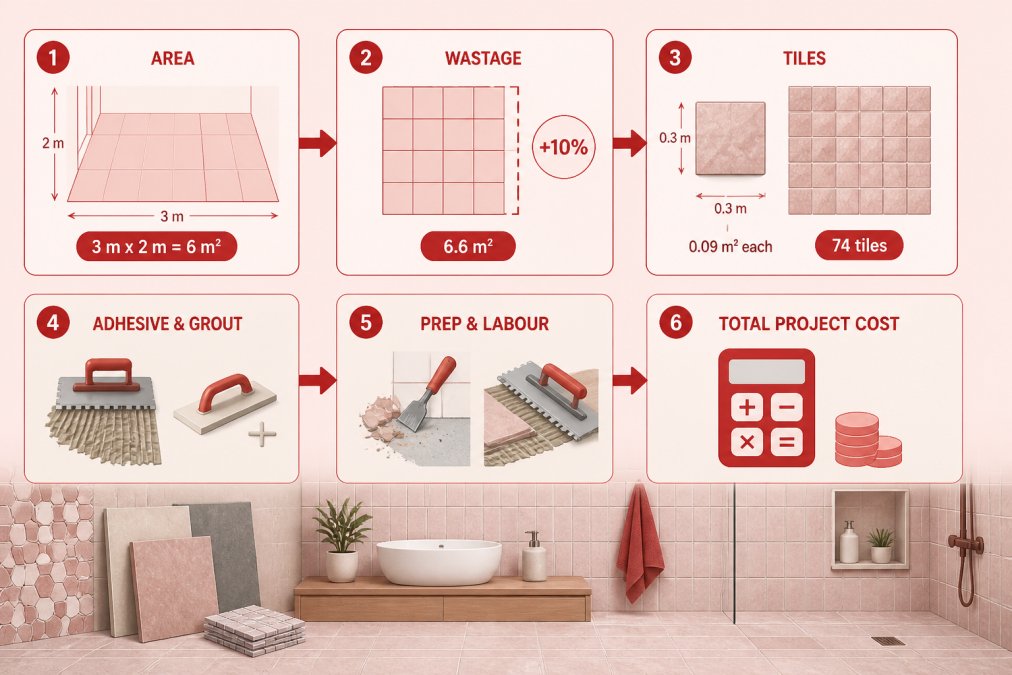
Add the lines together and you have your total. Change one assumption, such as wastage or layout, and the number moves.
The tile quantity is the only line you can calculate with certainty. Everything else is an estimate, so build in a buffer and keep the receipts.
Conclusion: Building Your Tile Renovation Budget
The challenge with any tiling budget is that the visible cost, the tiles, is rarely the biggest one. Prep, labour and wastage decide whether you stay on budget.
At Bargain Factory Tile Outlet, we stock floor, wall, bathroom, outdoor, subway and mosaic tiles, porcelain pavers, travertine, adhesives and tiling accessories across our 1,000 m² Campbelltown showroom. Bring your measurements in and we’ll help you work through the quantities before you commit.
Check current product pages for prices and specifications, or get directions and visit us at 20A Blaxland Road, Campbelltown.
Frequently Asked Questions
How do I calculate the total cost of a tile renovation?
Start by measuring your area in square metres. Multiply by the tile cost per square metre, then add a wastage allowance of 10-15% depending on layout complexity. Next, estimate adhesive and grout quantities using coverage rates on the product packaging. Add installation labour, surface preparation, and any finishing materials. Finally, include a contingency of 10-20% for unexpected issues. Bargain Factory Tile Outlet can help you verify quantities and specifications for your chosen tiles.
How much extra tile should I allow for cuts and breakages?
A standard allowance is 10% for simple, rectangular rooms with few cuts. Increase this to 15% for rooms with many corners, diagonal layouts, or complex patterns. For large-format tiles or intricate designs, allow 15-20%. Keep at least one spare box for future repairs, as dye lots can vary between production runs. Your tiler can advise on the specific wastage for your layout.
What costs should I include in a tile renovation budget?
Your budget should cover tiles, adhesive, grout, sealant, and any underlay or waterproofing membrane if required. Add installation labour, surface preparation (such as levelling or removing old flooring), and tools if you are doing it yourself. Don’t forget trim, edging, and spacers. Also budget for delivery or pickup, and a contingency for unexpected issues like subfloor repairs. Always check current product pages for material costs.
How can I estimate tile adhesive and grout quantities?
Adhesive coverage depends on tile size, trowel notch depth, and substrate flatness. Most adhesive bags state approximate coverage in square metres. For example, a 20 kg bag may cover 4-6 m² with a 6 mm notch trowel. Grout coverage depends on tile size, joint width, and tile thickness. Use the manufacturer’s grout calculator or consult your supplier. For accuracy, you can provide your tile dimensions and area to Bargain Factory Tile Outlet for advice.